Wednesday, August 18, 2010

Lesson 9: The Multiple Uses of a Rubbermaid Bin!

My house is slowly but surely coming together. I had my housewarming party a couple Saturday's ago and it was a big success! It was so nice to have so many people out to celebrate! Throwing a party is so much fun and I like to think that I'm a natural hostess, but I think if you were to ask Emerson I basically run around my house like a crazy person till people arrive and try to pull it together last minute. This post was inspired by a moment I had when I was cleaning and setting up for my party.

For a long time my basement had no furniture. Well, that's not exactly true... I had my 50" tv, a tv stand, and a rubbermaid bin. That's it. I know you're probably thinking, "Why didn't you go buy couches?" Good question. Most normal people would solve my problem in a second, BUT the issue at hand was finding ones that I actually liked and didn't mind sharing with roommates, etc. See, now that I have been spending lots of gold bars on things for my house (my collection of gold is depleting by the way... quickly) I thought about my couch situation and realized I'm way too much of a control freak to buy brand new couches and then let others ruin them by mistake. Not going to happen. I'm going to end up being like most of our grandma's out there who cover all their furniture in that plastic stuff so that if someone does drop diet coke or coffee I can just act all cool, grab a cloth, and say, "don't worry about it!"

Back to my story though... so I had a large Rubbermaid bin down there because I was going to store it in the back room. It is full of books, odds and ends, cords, whatever! Well, when I had no furniture down there and was DYING to watch the new Bethanny Getting Married on Bravo, I decided that this bin was the perfect size for me to lean up against. So that's how it started and it continued like this:

Day 1: Leaned up against the bin while I watched tv.
Day 2: Put a pillow between my back and the bin to make it a bit more comfy.
Day 3: Draped a blanket over the bin and pillow so it held the pillow in place (slowly starting to look like a couch).
Day 4: Put a large book on the top of the bin to hold the blanket steady and to act as a flat spot to put my drinks (now the bin is working as a coffee table and couch).
Day 5: Moved the bin to the direct centre of the room to showcase it as the most important fixture in that room.
My favourite bin ever!


As you have noticed, this bin became a huge part of my life. It made me not feel the rush to get couches until I wanted to have the girls over to watch a movie... then I realized my bin wasn't big enough for more than one person to lean up against it. I also couldn't risk the situation of having two people lean against my bin and it slowly sliding backwards as we try to watch tv... it would upset me. So, I cancelled tv night and decided to dedicate my time to couch finding.

My luck, my dear friend Laura was moving and asked me to take her couches.. so I did. You'll notice though in the picture below that I've become quite attached to my Rubbermaid Bin furniture as it still sits next to the couch acting as a side table. I didn't want it to feel left out.

My current couches (notice the bin still peeking in there).
Things I learned from Lesson 9: 
1. Rubbermaid bins aren't just good for storing crap, it's a way to justify keeping that crap in big bins because it makes it heavy enough for a person to lean against.
2. Next time you have party and need extra seating, take out some bins and drape them in blankets...it'll be trendy, I promise.
3. When people ask you constantly why you haven't bought houses and why you're using that awful bin, just tell them you hate having people over, so having no furniture will keep people away. It'll create an awkward situation and hopefully no one will ask you again.
4. Couches are MUCH comfier than the Rubbermaid bin, I know its obvious, but I feel like I almost forgot how comfy couches actually are and how necessary they are when watching tv!

Wednesday, August 4, 2010

Lesson 8: Beware of Charlie... He's a Creep!

There is definitely a theme of yard and garden lately but when you own a house it's such a big part of it all! The lawn is looking pretty sad in general. The only person who seems to care and help me with it is Emerson! He's been doing a lot of work for me such as cutting the grass and weeding and I am very appreciative of it! A couple weeks back we were looking at my back yard and trying to draw up a plan for making it much better. Honestly, there is so much that can be done.. it's like a blank canvass.. the only problem is I'm too lazy of an artist to paint a beautiful picture if you know what I mean!

While Emer and I were looking at my back yard I pointed out this clover type weed that seemed to slowly be eating up my lawn. I mean it's kind of pretty if you like clovers. It's really green and.. well... it looks like clovers which are supposed to be lucky, so LUCKY ME! Not quite. Emer decided to investigate and found out that it's something called Creeping Charlie and it is not cute nor lucky. It made me start to think... who names plants? Why would they look at this clover type weed and name it Charlie? I mean, I get the whole creeping gig because it's literally creeping around my backyard making a home for itself. But why Charlie? Does the plant-namer just have a thing for alliteration? I'm going to google this. Sorry, I digress.
 Creeping Charlie creeping in my wood chip area... 

More of Charlie creeping up my nice tree!

It's pretty easy to rip out with your hands because it's all connected. It's arms are long and lanky and it wraps around everything on your lawn. The more I think about Creeping Charlie, the more it makes me think of it in a personified manner. I can't help it, I'm imaginative. I think of myself standing at my kitchen window looking out into my backyard and here's this sketchy man laying on my grass, rolling around, and covering my grass. I picture myself yelling at him through the glass, "Hey! Who are you??" and he looks at me still rolling around on my grass and calls back, "My name is charlie" and then he gives out a creepy laugh. Creeping Charlie scares the crap out of me.

There is a way to get rid of him or it. Emer discovered from my neighbour that you can spray it and it will die. Back to my imaginative world, I picture myself walking outside and standing at Creeping Charlie's feet and spray his face with a Windex bottle full of whatever it is I'm supposed to spray Creeping Charlie with. He then gives out a scary scream and disappears.... I don't think getting rid of the real Creeping Charlie is going to be that dramatic although it'd be way more entertaining.

Things I learned from Lesson #8:
- Once again, lawn and garden are the neediest parts of owning a home.
- Take time to identify if you have Creeping Charlie. Don't assume, like me, that my back yard is slowly becoming the luckiest place on earth!
- Look into getting a job as a plant-namer... it could be a LOT of fun.


Tuesday, August 3, 2010

Lesson 7: The Death of My Potted Plants

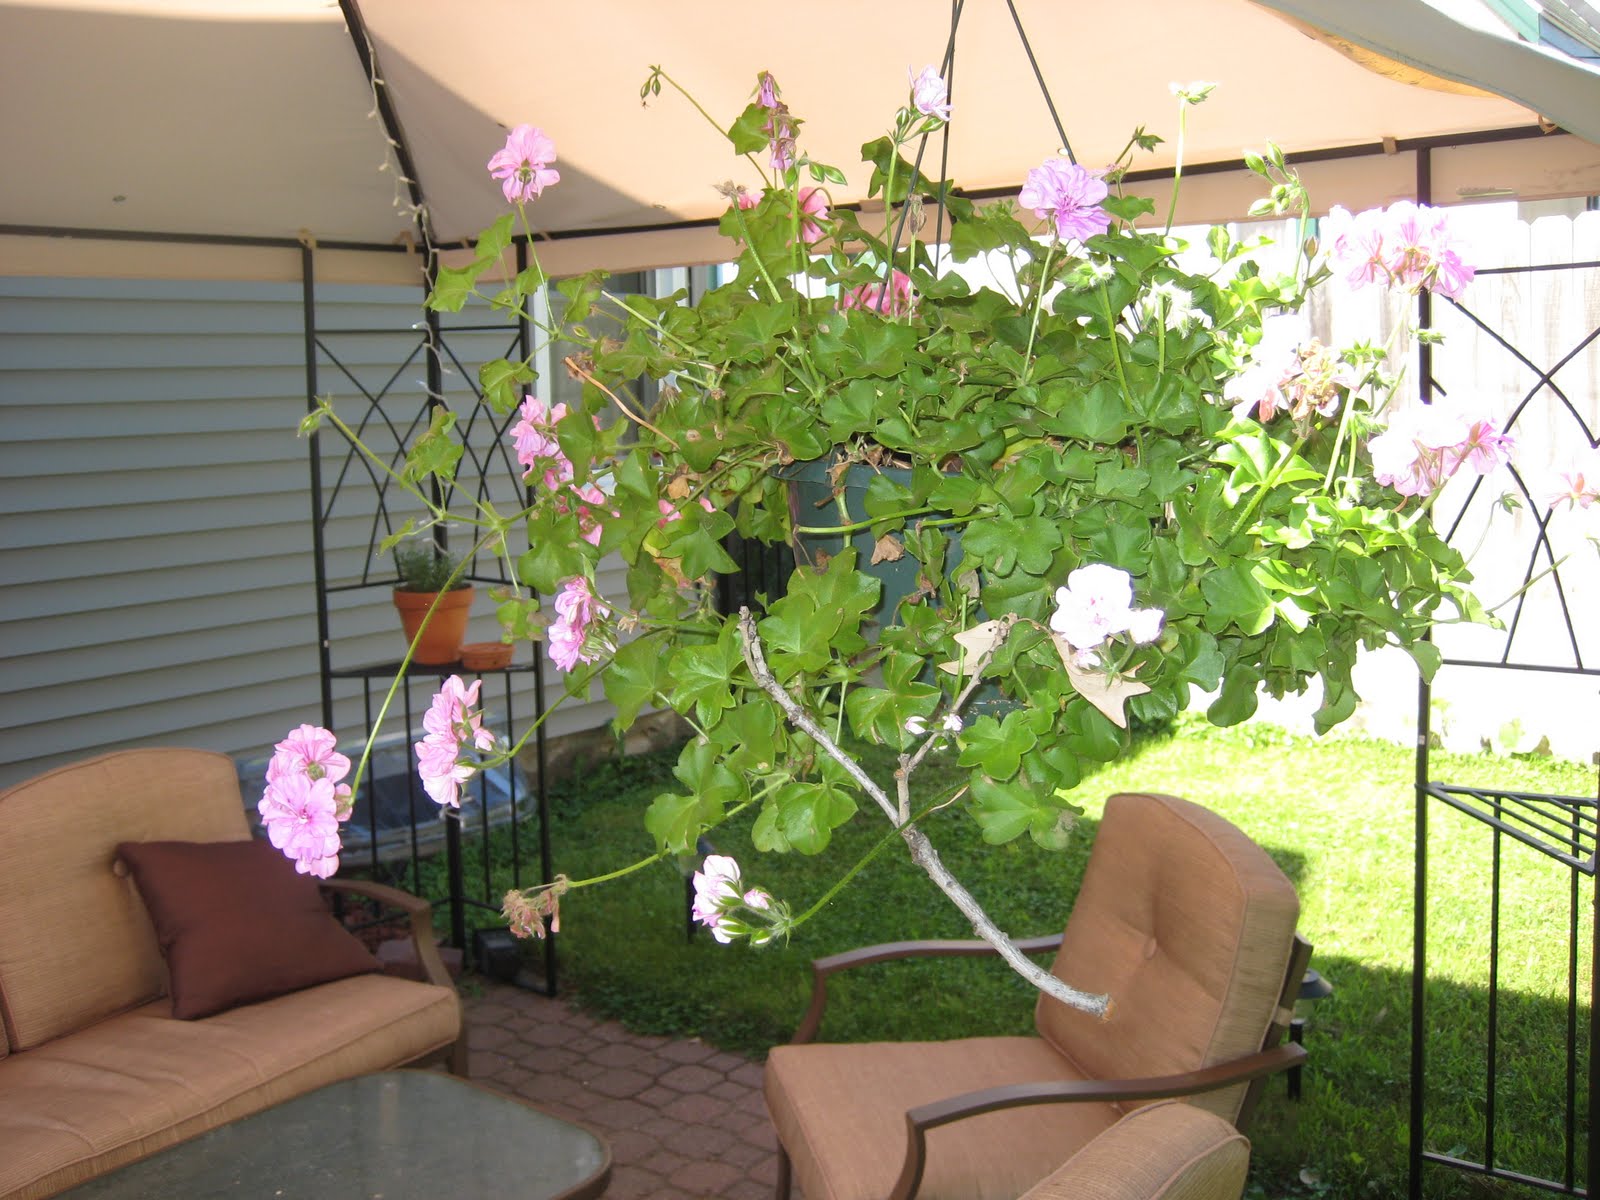
I know I already wrote below on lawn and garden care, but this honestly is a never ending topic! I'm not kidding. As you all know I was out of town all of the last week for work and I'm going to blame that one week away on the horrendous condition my potted plants are. In all honesty though, my potted plants were doomed from the start. The day I brought home my very first two potted plants I feel like 10 minutes after I hung them they started dying. They rebelled against my potted plant regimen and to show me, they began acting up in a very ugly way!

The pictures below show you the current condition of my three potted plants:
Plant #1: I honestly did not plant that stick there... it was there when I took the picture!
Plant #2: Well, it speaks for itself. 
Plant #3: This is how I found it this morning, NOT kidding!
Okay, so those pictures are a tad horrifying! I know! Plant #1 has never been a friend as the day I brought it home it refused to bloom right away and then it started growing it's arms and legs in every which way. I like to tell people when they come over that Plant #1 is very reminiscent of Einstein's hair.
Plant #2 bloomed so beautifully when I first brought it home. I even liked this plant so I would feed it miracle grow from time to time (it was my favourite so I gave her a special tonic to show her) but lately all it wants to do is die and shrivel up and turn brown. It's like she's turned into an ugly person who can't live without the special tonic. I haven't given it to her in days so maybe she's in with drawl??
Plant #3... well, as you can see it committed suicide yesterday or last night. I don't blame it. It was mint and it started to look pretty funky. I felt like it was trying to grow out of the pot so it could run away and re-plant itself in my neighbours gardens (which are so nice). Instead, she just decided it wasn't worth continuing and plunged off of the ledge of my gazebo tent.

People keep telling me the following: 
1. You can't over water.
2. You have to make sure it's getting the right sunlight.
3. Make sure you're giving them plant food.
4. Make sure the soil is damp but not too damp.
5. You may have to prune them (hair cut).

Honestly, potted plants are like having children except they don't talk back to you and ask you to buy them pretty things! I did not sign up for this. You're probably wondering what I'm going to do right? Well, I think that Plant #1 and #2 are going to survive and since I refuse to give in to their neediness they will hopefully bloom for a bit longer till the fall hits. Plant #3 I'm going to let lay on the ground for a bit as it's way too hot for me to go outside and clean it up (it's over 90 degrees here today), but when I do clean it up I'm going to tell it that it should have been grateful for what it had.

Things I learned from Lesson #7:
1. If you don't want the responsibility of children, don't get potted plants. You're just setting yourself up for disappointment.
2. Cactus and fern type plants apparently are impossible to kill. I recommend those.
3. Don't spend a lot of money on pretty pots because your plants just may rebel and not only ruin themselves but shatter the nice home I gave them. I could have reused that pot for something else!

Lesson 6: Don't Fly Off the Handle!

To all my readers out there, sorry I have taken some days off! There are so many disappointed people (I'm sure) that have been awaiting my next blog post, but my most recent trip to India had me a little tired and I had to get my life back in order! Don't worry though because today I'm going to try to catch up on some blog posts I've been meaning to do for awhile.

When I bought the house my parents had very nicely offered to give me my grandparents old bedroom furniture for my master bedroom. I was excited because my mom refinished it so it was a beautiful black*. Tip for all of you readers out there; all he did was sand and spray paint it black! You'd never think spray paint was something you could use to refinish furniture (and wood furniture) but it looks fantastic! My parents came down to help me move and brought the "new" furniture with them for me. The only issue was that the old handles didn't match the face lift that the furniture had underwent so my one task was to find new handles for both my large dresser and two night stands. In total I had to get 13 handles.

My large refinished black dresser


I had decided that I would put it off for a few days because I was so busy doing other things like facebooking. Then one morning as I went to open my new dresser with the screwdriver I had been using for the past week to open all of the drawers I realized that I was really tired of using a stupid screwdriver, so I went to Home Depot. I grabbed one of the old handles to take with me so I would get the right size... see, I was being proactive! A little more domestic everyday!

I went to Home Depot with my handle in hand and found a really nice pewter coloured handle that would match perfectly. Another tip for all you people out there... handles are NOT cheap! Wow! Each handle was $8 which meant I was going to spend... (sorry I had to open my calculator and do the math)... $104 on stupid handles! Ugh. I was happy though that I now had handles and I was going to install them all on my own!

As I worked to install all of the handles I started with the night stands and then began on the dresser. I started to get a little upset though when I realized 6 of the 9 drawers on my larger dresser were NOT the same size handle as the others. Who builds a dresser and decides that the handles on more than half of the drawers should have different size fittings than the rest? It makes no sense! Instantly I picked up my receipt and the handles that didn't fit and went back to Home Depot to return them. I took a handle from the different size drawer to hopefully find the same handle in the different size.

Well, long story short Home Depot, Menards, Walmart, Target, and Ikea did not have ANY handles that matched the size of these remaining 6 drawers. Then it hit me.... I was going to make my own handles! I went to the nearest Fabric Store (which I had to google and map out directions because I've never been inside a fabric store here before) and bought yards of black laced ribbon, little crystal beads, black thread, and a needle. In my head, I envisioned these beautiful handles that would look very elegant and graceful like that in a Country Home magazine. I could hear my phone ringing and Martha Stewart asking me where this brilliant idea came from and I'd reply, "Oh Martha, sometimes you just have to use your creative side" and I'd chuckle and ask her if she's read my blog. I got home and got to work right away. I turned on Bravo and began working on my handles.


Steps to Making My Own Handles: 
1. Cut ribbon into lengths that look about the right length to thread through the drawers.
2. Thread ribbon through the drawer holes and tie a knot on the inside of the drawer.
3. Use the black thread to attach a bead or two to the end of he ribbon (on the outside of the drawer)
4. Take a moment to admire your amazing work!

Now, my dresser is complete. I have 6 drawers with self-proclaimed pretty ribbon handles and 3 drawers with the handles I bought from Home Depot. Should I probably remove the other handles and do ribbon everywhere? Yes. Will I? Maybe... I'm busy facebooking.

My ribbon handles!


A close up shot of my beads.. barely hanging on!

Things I learned from Lesson #6: 
1. A screwdriver works well to open a dresser with no handles. It may even be a great idea to create some sort of modern design dresser with screwdriver handles built in.
2. When looking for an odd size handle, it won't get you anywhere when you ask the people that work at these stores (that sell handles) who their handle vendor is and how you get in contact with them. They don't know nor do they care.
3. Also, don't threaten to write a letter to the handle vendors because again, it won't get you anywhere.
4. When deciding to put beading on your ribbon handles, ensure you actually sew the beads on tight. You'll notice in my pictures some of these ribbon handles only have one bead as a lot of them fell off after the first day.
5. Be prepared to take criticism and back up your creative approach to handles... it seems many people think it's a silly idea. Ugh.

*After I published this post, my mom reminded me that not only did she refinish (and do a fabulous job) my bedroom furniture but she did it while in a cast and had to move around using a wheely computer chair. Thank You Mom!

Sunday, July 25, 2010

Lesson 5: Appropriate Travel Mannerisms

This blog is titled, "Undomesticated Me" and it mainly refers to my adventures of owning a house and becoming more domestic BUT since my life also includes much travel for work, I feel I need to blog about those adventures too because not only will they act as entertainment for all you readers, it's a channel for me to vent (which is much needed)!

It is late at night in Minneapolis, but here, in my reality, it's 7:25am in Germany! I'm in the Frankfurt airport and just got here from Toronto and am en route to good ol' Bangalore, India. Yes, that's right, India, not to be confused with Indiana (someone asked me that yesterday, "Oh, you mean Indiana?" and I responded, "no, I don't"). Work calls and they have asked me to facilitate some training seminars at one of our corporate campus locations in India for two days. Yes, I'm traveling for four days basically for two full days of work.

I have been doing the International travel thing quite a bit this year and I've picked up some of the "best practices" or "tips and tricks" that I think all people should follow:


Things I feel are "Best Practices" for International travel:
1. Don't be that person who is shocked and roll your eyes when the security people ask to see your passport. They are just trying to verify your identity for yours and more importantly, MY, safety! You brought it with you for a reason.
2. Never rely on airplane food because it is usually super duper bad. This is obvious and everyone is probably like, "Thanks Katie, that's not really new or exciting." You're right... but in all honesty, it's important to remember!
3. Socks. Wear them and bring a clean pair in your carry on. I hate it when the guy three rows back from me takes off his shoes and has the sweatiest, smelliest feet ever. Sometimes I wish the flight attendants would come by and put barf bags over them like little paper slippers.
4. Carry on luggage needs to be neatly packed and not exploding with ALL of your personal belongings, purchases and more. The guy next to me today had a suitcase that was literally exploding at the seams and then he had another huge bag which he tried to shove under the seat. Every 30 mins he was at that under the seat bag and would keep bumping me because he had to dig through so much crap!
5. Deodorant. Wear it. Enough said.
6. If I don't say "Hi" to you when you sit next to me OR if I'm wearing head phones don't talk to me, please.

On today's plane ride from Toronto to Frankfurt, Germany I had a young guy sitting in front of me who kept putting his hands over the back of the seat and they would keep touching my movie screen. Every time he touched it with his fingers my movie would pause or the menu would pop up. That was very annoying. I kindly tapped him and asked him if he could refrain from touching my screen. He smiled at me and nodded and then I realized five minutes later when he did it again that he didn't speak English. I won't be that ignorant person and say, please speak English everyone, but I was annoyed to say the least.

To wrap up this long winded post (I've been awake for a long time and my wittiness is running dry) I attached a pic from the Toronto airport. I love the giant Beaver he's cute and very Canadian.... hmmmm.

Wednesday, July 21, 2010

Lesson 4: The Kitchen is Supposed to Be Used

In my continued attempt to at least pretend I'm domestic, I realized it's probably time that I use my kitchen. I've had some people over in the last month and a half and it usually has been for bbq'ing or grilling, but that entailed everyone bringing something, usually me mixing up my specialty (guacamole), and sitting outside. You may even say my kitchen is a popular place to be as it seems whenever I have people over we congregate in the kitchen but it's definitely not because I'm baking or cooking. I remember saying to my realtor and parents when I was looking for a house, "It'll be so nice to have a nice sized kitchen!" Ha! Apparently in my search for a house I had this grand vision of me cooking large Martha Stewart type meals for all of my friends and family and wearing an apron and saying things like, "Oh you like that glaze? It's just something I threw together that I thought would bring out the true flavour of the roast." Could you imagine?

So tonight I decided that I was going to actually use my kitchen and cook a real meal. Emerson is taking the GRE tomorrow and to ensure he has a lot of brain power I felt a good home cooked meal by moi would be a great idea! I called my mom this morning from the office (I was really busy apparently) and asked her for my Mama's (Grandma) meat loaf recipe. I always loved my Mama's meat loaf and I thought making it tonight would also be a great way to remember her and show her that I am not useless in the kitchen but actually quite the opposite. I mean who knows, I could turn out to be a genuine Rachel Ray! Anyway, I called mom and she gave me the recipe and I went to the grocery store after work.

Now, I didn't follow the recipe exactly... only because it called for a little bit of pork and I couldn't find any and I was just much too busy to ask anyone. I got home and got started. I took pictures along the way which you see here.
The ingredients. Don't worry, light bulbs are there because I have some burnt out ceiling lights!
Mixing up my ingredients!
Making it a "loaf"
Much needed throughout the process...

Okay, it's now 10:34pm and I have to let you ALL know that the meatloaf was a total success! It tasted delicious and the potatoes I boiled were fabulous (very tricky potatoes.. you just put them in water and boil)! Emerson told me that it was really really good! I'm going to take that and let you all know that I, tonight, had a domestic moment by showcasing my unknown cooking talent! Will I be making elaborate meals from now on? No. But now I at least can say, "Hey I cooked dinner last week so let's just go out".
mmmmm so good!

Things I learned from Lesson 4: 
- When the oven is on it makes my kitchen very hot and I felt like I was sweating... I didn't like that.
- Apparently meat loaf is kind of "juicy" and you need to put the dish on a pan because if you don't meat loaf juice will spill all over the inside of your oven and burn. It sucks.
- Buy a kitchen timer. I made blueberry muffins before putting the meat loaf in and was quickly reminded that I will forget what time I put things in the oven and I will get distracted by something and lose track of watching the clock.
-Wine... it just tastes so good.

Lesson 3: Don't Rely on Your Inner-Level


Readers, you are so lucky because I'm playing catch up on blog posts! All of these things have happened in the last month and a half of living in my new house, but they are all so important to share.

Everyone gets so excited about a new house because they get to decorate! Now, I'm not a great decorator but I'm pretty sure I have the best taste out of anyone I know. I haven't had time yet to paint or do anything major, but I have had time to hang pictures, frames, and stuff to add colour to my space.

My mom bought me these two really nice pictures from good old Canadian Tire! Side note, if you're looking for fun pictures, Canadian Tire is where it's at! For those of you who are not my Canadian friends, Canadian Tire is like a Home Depot / Walmart but yet so much better. Anyway, these two pictures are great! I brought them back with me from Thunder Bay and decided that they belonged in my living room.

I am not a patient person. I know, this is shocking to most of you. When it comes to hanging pictures I'm especially not patient my Dad would probably say I'm just lazy.

My way of hanging something on the wall goes like this:
1. Find a picture you want to hang.
2. Find a spot on the wall that I think would fit that picture.
3. Hammer a nail (don't worry too much about how big or small this nail is) into the wall.
4. Hang the picture on the nail and hope it stays.

Perfect.

Well, this time things were a bit trickier because I wanted to hang these two pictures side by side. So this meant I had to re-think my typical wall hanging steps.

My way of hanging side by side pictures on the wall:
1. Find two pictures you want to hang side by side.
2. Find a spot on the wall that I think will fit both.
3. Hammer the first nail into the wall (again, not too worried about the size of the nail).
4. Hang first picture and hope it stays.
*Now, here's where it differs and gets tricky...
5. Put my elbow on the first picture and lay my arm straight across the wall and mark the approximate spot for the next picture to go. Scratch spot with a nail.
6. Take another nail and hammer it into the wall in the spot that looks "just about right" compared to where my mark is and where I believe the other nail is in the wall.
7. Hang second picture and hope it stays.
Boom.
Done.

I was so proud of myself for hanging these two large pictures. They looked pretty good except for the fact that they definitely weren't even. The second picture was much lower than the first. So, in true fashion, like anyone would do I took the picture down from the wall, used my hammer to remove the nail and then again used my "inner level" to move the nail up a bit till I believed it was right on! I then hammered it in, and hung the second picture back up. Boom. Done.

Well, it looked much better than the first time but it's still not exactly right. I assume that most people don't notice it. If you look at the pictures I posted you'll see that it's only slightly off.

What I learned from Lesson 3:
- My "inner level" is not exactly reliable.
- Every time you put a nail in the wall it leaves a hole. Every time. Good thing these big pictures cover up my mistakes.
- My arm is not perfectly straight all the way across and does not act as a perfect ruler.
- Don't attempt to hang pictures when you're hungry... it distracts you. By the second attempt at hanging pictures I was way more interested in getting a cheese string and watching whatever I had recorded on my DVR (most likely "Say Yes to the Dress", "Cake Boss", or "Housewives..").